
Welcome to our rural knowledge base
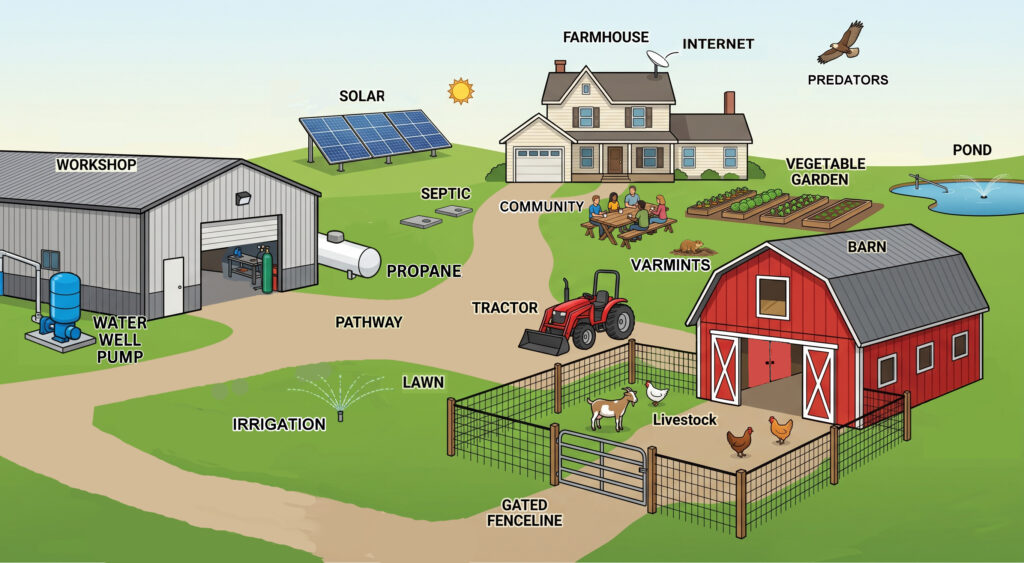
If you see an area YOU would like to spearhead, let us know! We would love to add to this rural knowledge base. FIll in the blanks, add to or modify what is here. Join the forum!
Table of Contents
As with this entire site, we are just beginning to piece the rural knowledge base together. If you are interested in moderating or building out one of these topics, please let us know! Get in on the ground floor!
Water:
We cannot live without it, nor can this rural knowledge base. Typically need potable and irrigation. Well water typically needs some treatment, for a certainty ponds, streams, and rivers will. Some properties have access to irrigation districts, try to secure a home or property below the irrigation water source, whether a district a stream a pond, etc., so gravity does the work for you. One foot of rise is 0.43 PSI.
Irrigation:
Does not need to be potable and often is NOT, especially when from an irrigation district (ID)
Drip Irrigation (Low Pressure)
- Optimum Range: 15–30 PSI
- Why: Drip systems use tubing and emitters that are not very robust. Anything above 30 PSI often risks blowing out fittings or causing the emitters to malfunction. If your home water system is at a standard 50–60 PSI, you must use a pressure regulator to drop it down to this range.
Standard Sprinklers (Spray Heads)
- Optimum Range: 25–35 PSI
- Why: Spray heads are designed to produce a specific droplet size and spray pattern. If pressure is too low, they won’t cover the full radius. If it is too high (above 40 PSI), the water atomizes into a mist that evaporates before it hits the ground.
Rotary Sprinklers (Large Area)
- Optimum Range: 40–60 PSI
- Why: These systems need more force to drive the gear-driven rotors. They are designed to operate at higher pressures to achieve a long throwing distance.
KEY TAKEAWAY: If you can approach 60 PSI and use pressure reducers where necessary, you will be doing very well.
Well, if you have no water provider (yes, a play on words), you most likely have or need a well. There are a lot of things to consider.
Contamination:
Fertilizers, pesticides, spills
Pumps:
Submersible, above grade, VFD (Variable Frequency Drive), Soft start,
Testing:
Chemicals bacteria, odors, heavy metals
Filter(s):
Chemicals bacteria, odors, heavy metals
KEY TAKEAWAY: This portion of the rural knowledge base may be the most important. In the rurals, you are the water district. Never take your well for granted; regular production testing and annual water quality checks are the only way to catch a dropping water table, before your taps run dry, or contamination, before it impacts your health.
Wastewater
Septic Tank:
Size is typically two to three times the daily flow. They are engineered around peak daily flows. A very rough number is 500 gallons per bedroom. The longer the solids can sit, the greater their settling and decomposing rates are. Ours has two distribution pits, one that does not appear to have ever had to handle effluent. We had to pay a company to come out and locate the entire system, it was all buried. We extended the two septic tank lids to be “at grade” and drew a map of everything. Building codes typically disallow building within so many feet of the “system”.
Disbursement Pit(s):
Depending on your property’s soil, layout, and space, a disbursement pit generally serves one of two distinct purposes in a rural septic system:
1. The Deep Well (Traditional Seepage Pit)
This type is typically used when a property lacks the horizontal acreage for traditional long leach lines, but possesses deep, fast-draining soil. It is a deep, covered excavation—often lined with perforated concrete rings and wrapped in gravel. Instead of spreading wastewater out horizontally, it receives the liquid effluent from the septic tank and allows gravity to pull it vertically, seeping deep into the earth. These are HIGHLY unlikely with acreage and NOT a desired method due to potential well water infiltration.
2. The Distribution Hub (Junction Pit)
In more complex setups, a disbursement pit acts as a solid central hub to route, cascade, and manage water flow to multiple leach lines or other pits. In this design, the pit itself sits slightly lower than the leach lines and utilizes pipes set at different heights to create a sequential flow:
- The Setup: The pit features one main influent pipe (bringing water in) and multiple effluent pipes (sending water out).
- The Staggered Flow: The effluent pipes are purposefully set at slightly different elevations. As the pit takes in water, the liquid reaches the lowest pipe first, feeding your primary leach line. If the water volume increases, it rises to the next lowest pipe to feed a second leach line. Finally, the highest effluent pipe can act as a delayed overflow, routing water into an entirely separate secondary disbursement pit with its own set of leach lines.
Key Takeaway: Whether you are relying on vertical seepage or using a pit to sequence water to your leach fields, always check your local codes (AHJ) before digging. Water tables and soil types dictate strict rules on how and where disbursement pits can be utilized to prevent groundwater contamination.
Leach Line
If you have a system like mine, or are planning one:
1. Trench Dimensions & Excavation
- Width: Typically excavated to 24 inches wide (making it easy to run standard equipment like a backhoe bucket or trenching attachment across your acreage).
- Depth: Usually ranges between 18 to 36 inches total, depending on your local frost line, soil cover requirements, and the elevation of your distribution pit output pipe.
- Leveling: The bottom of the trench must be meticulously graded with a very slight, consistent slope (usually about 2 to 4 inches of drop per 100 feet) away from the distribution pit so effluent travels down the line smoothly without pooling at the start.
2. Aggregate Base (Clean Gravel or Rock)
- Bedding: Lay down approximately 6 to 8 inches of clean, washed gravel or crushed stone (typically 3/4-inch to 2-inch washed drain rock) across the bottom of the trench before placing the pipe. Avoid crushed limestone if local soil chemistry causes cementing, and never use dirt-filled gravel.
- Purpose: This stone bed acts as a structural cushion and storage reservoir, allowing liquid effluent to pool temporarily and soak into the underlying soil across the entire surface area of the trench.
3. Perforated Distribution Pipe
- Pipe Type: Use standard 4-inch SDR 35 or corrugated perforated PVC pipe.
- Hole Orientation: Lay the pipe down with the pre-drilled or slotted perforations facing downward (typically at the 4 o’clock and 8 o’clock positions) to direct the water smoothly into the gravel bed rather than shooting it straight up against the top cover.
- Connection: Tie the upstream end directly into your distribution pit’s designated effluent outlet pipe at the correct cascading elevation, making sure the joint is secure and sealed.
- Cover Gravel: Once the pipe is leveled and set in place, carefully backfill more clean gravel over and around the sides of the pipe until it is covered by at least 2 inches of stone over the top crown of the pipe.
4. Geotextile Filter Fabric Barrier
- The Cover: Lay a layer of non-woven geotextile filter fabric directly over the top of the gravel bed before backfilling with native dirt. If you native dirt has sharp angular rock and you do not want ot clean that out, do a couple of inches of sand to protect the fabric from being punctured
- Why it matters: This is a crucial step to prevent fine soil, silt, and dirt from washing down into your clean gravel bed over time, which would otherwise prematurely clog the voids and ruin the absorption capacity of the trench.
5. Final Backfill
- Topsoil: Finish by backfilling the remaining trench depth with your native excavated soil – possibly putting 2″ of sand first, mounding it slightly (about 4 to 6 inches higher than grade) to account for natural settling when the earth packs down over time. You can also tamp the soil as you backfill.
1. Protect the Pipe (No Heavy Tamping on the Crown)
- The Danger: If you take a heavy mechanical tamper (like a plate compactor or a jumping jack) directly over the 4-inch perforated pipe and gravel bed, you risk crushing the pipe or shifting your carefully leveled grade.
- The Right Way: Never apply heavy compaction directly on top of the pipe or the surrounding drain rock. Tamp your soil around the edges of the trench and over the geotextile filter fabric layer using hand tools (like a manual hand tamper or the flat backside of a shovel) rather than heavy machinery.
2. Compact in 6-to-8-Inch Lifts
- The Method: Instead of tossing all the excavated native dirt back in at once and letting time do the work, backfill in shallow layers (lifts) of about 6 to 8 inches at a time.
- Why it works: Tamping thin, incremental layers ensures that the air pockets are squeezed out uniformly throughout the depth of the trench, dramatically reducing future sinkholes and major settling.
3. Keep the Slight Mound at the Top
- Even with careful tamping, loose native earth will always settle a bit over the first few rainy seasons as the soil settles naturally.
- Leaving a gentle 4-to-6-inch crown (mound) right over the center of the trench ensures that when it eventually packs down tight, the surface will grade out flush with the surrounding undisturbed ground rather than turning into a depressed rainwater collection ditch.
Livestock
Property Lines
In rural areas, old fences, hedgerows, and historical assumptions rarely align with legal deed boundaries. Relying on “gentlemen’s agreements” or visual guesswork with older fencing can lead to expensive encroachments, legal disputes with neighbors, or structural placement mistakes (such as building an outbuilding, fence, or septic components too close to or over your actual boundary).
Finding and Verifying Boundaries
- Start with the Recorder’s Office: Pull your plat map, legal description, and subdivision or parcel maps from your county recorder or assessor’s office.
- Look for Physical Monuments: Search your acreage for existing survey pins, iron pipes, concrete monuments, or blazed trees left by previous surveyors. However, never assume an old fence line represents the legal property line.
Hiring a Professional Land Surveyor
When stakes are high or boundaries are unclear, hiring a licensed professional land surveyor is the only way to obtain a legally binding determination of your property lines.
- The Cost: Professional boundary surveys for rural acreage typically range anywhere from $1,500 to $15,000+, depending heavily on the size of the parcel, the terrain, the amount of brush and timber to clear, and how long it has been since the last official survey. Large, rugged, or heavily wooded rural parcels with difficult terrain can push costs even higher.
- What You Get: A certified Record of Survey filed with the county, iron pins set at every property corner, and clear, legally defensible stakes along your boundary lines.
KEY TAKEAWAY: Spending money upfront on a professional survey is cheap insurance compared to the catastrophic cost of moving a newly built fence, barn, or driveway that accidentally encroaches on a neighbor’s property. Encroach, in some respects may be if it is less than 30′ from the actual property line, as it is where we are – check your local codes and laws..
No Rural knowledge base can skip equipment. Most often the decision needs to be made up front, buy, lease, or rent. Some of these may pay for themselves many times over.
“I can dig by hand…” Most acreage needs equipment to get work done quickly. Digging a trench to 24″ deep by 24″ wide by 250 feet long in dry, compacted, rock-impregnated earth is NOT an easy task by hand. We need your equipment expertise to build on this aspect of our knowledge base.
Backhoe:
Also called a combo or combination. It has an “excavator” on one end and a loader on the other. This is, perhaps, one of the most widely used pieces of equipment in the rurals.
Excavator:
An awesome piece of equipment. Anytime something is built for one thing, it typically has a few more features than something like a combination. In this case, it is often on tracks versus wheels and instead of having to turn around, you spin the whole thing on top of its tracks. They come in a lot of different sizes.
Loader:
Often built on a heavy-duty chassis with a large front bucket, loaders (often referred to as wheel loaders or front-end loaders) are indispensable for moving large quantities of loose material, gravel, dirt, or debris across your acreage. Unlike an excavator designed primarily for deep digging, a loader excels at scooping, lifting, carrying, and dumping massive payloads quickly and efficiently.
Others:
Power
Need rural knowledge base help!
Utility
Solar
Generator
Batteries
Food
Structures
Home
Barn
Shop
ADU
Critters/Varmints
“Pets”
Dogs
Cats
Donkeys
Forever Fluid: The Nature of the Rural Knowledge Base
As with any authentic rural homestead or homesteading lifestyle, this knowledge base is forever fluid. Rural living is never a static checklist; seasons change, equipment breaks and gets upgraded, water tables fluctuate, and DIY solutions evolve through trial and error. This resource is designed to grow, adapt, and shift right alongside our property and experiences.
To ensure this knowledge base reaches those who need it across the digital landscape, we also embrace the realities of modern search architecture. While our primary focus is always on practical, ground-level insights, we intentionally weave in essential rural keywords and phrases—from well pump maintenance and septic drain fields to property line surveys and heavy machinery operations. In our case, the keyword phrase is “Rural Knowledge Base”, what we felt might be a potential high-demand search term. The downside, weaving that into the page. This blending of boots-on-the-ground practicality with strategic phrasing helps bridge the gap between real-world rural know-how and online discoverability, ensuring our DIY community continues to grow from the ground up.